Screen Scratch Remover Repair Kit for All Smartphones Tablets and Watches Complete Set of 3 Diamond Polishing Compounds and 3 Wool Cloths and Oleophobic Coating
Product Description ProofTech Screen Scratch Remover Repair Kit Revive Your Screen, Unleash Brilliance: ProofTech – The Ultimate Repair Kit! Removing scratches from your device’s screen may seem like an impossible task, but with a bit of time and patience, it can often be achieved. In this guide, we’ll provide you


Price: $29.99
(as of Aug 03, 2024 04:17:22 UTC – Details)

Product Description
ProofTech Screen Scratch Remover Repair Kit


Revive Your Screen, Unleash Brilliance: ProofTech – The Ultimate Repair Kit!
Removing scratches from your device’s screen may seem like an impossible task, but with a bit of time and patience, it can often be achieved. In this guide, we’ll provide you with step-by-step instructions on how to successfully polish your device’s screen and remove any pesky scratches. The first step is to determine whether the scratch is “light” enough to be removed. This means that it should be visible to the eye, but not easily felt when running a fingernail over it. If the scratch is deep, attempting to remove it may damage the functionality of the screen. If a scratch on your device’s screen is deep, it’s better to accept that it may be permanent. However, you can make the scratch slightly less noticeable and irritating by using the ProofTech Glass Scratch Remover Kit. nce you have the appropriate set, it’s time to get started on removing the scratch. Start by cleaning the screen and using tape to isolate the scratched area from the unscratched surface. Finally, follow the instructions provided with the set to effectively remove the scratch and restore your device’s screen to its former glory.
.
.
Understanding Screen Scratches: Exploring Solutions with ProofTech Scratch Remover Kit


Removing scratches from your device’s screen may seem like an impossible task, but with a bit of time and patience,it can often be achieved. The first step is to determine whether the scratch is “light” enough to be removed. This means that it should be visible to the eye, but not easily felt when running a fingernail over it. If the scratch is deep, attempting to remove it may damage the functionality of the screen. If a scratch on your device’s screen is deep, it’s better to accept that it may be permanent. However, you can make the scratch slightly less noticeable and irritating by using the ProofTech Glass Scratch Remover Kit.
.
.
INSTRUCTIONS


1 – Clean the glass surface thoroughly with the cleaning wipe supplied in Sachet 1
2 – If you’re applying the compound to just a small area or a scratch, we recommend using a tape to isolate the unscratched parts of the screen. This will prevent the polishing compound from accidentally scratching other areas of the screen.
3 – Start with the 4,000 grit compound to reduce the scratch. Apply a small amount of the compound to a woolen cloth. Spread the compound evenly over the scratched area of the screen. Use gentle pressure and make sure the compound covers the entire area. Buff the surface in a circular and/or back-and-forth motion until the scratch disappears. Continue to buff?until the surface is smooth and shiny.
4 – Use a clean, separate piece of wool cloth (to avoid contamination of diamond compounds) for the 8,000 grit and follow the same steps to remove the scratch.
5 – Use a clean, separate piece of wool cloth for the 50,000 grit and follow the same steps for the final polish.
6 – Remove the tape (if applied), clean or buff the glass surface thoroughly.
7 – Apply OLEOPEL oleophobic coating wipe, supplied in Sachet 2 in circular motion to the glass. Allow it to cure for at least 30 minutes. When dry, a residue may be visible on the surface.
8 – Buff the screen using the micro?ber cloth supplied.
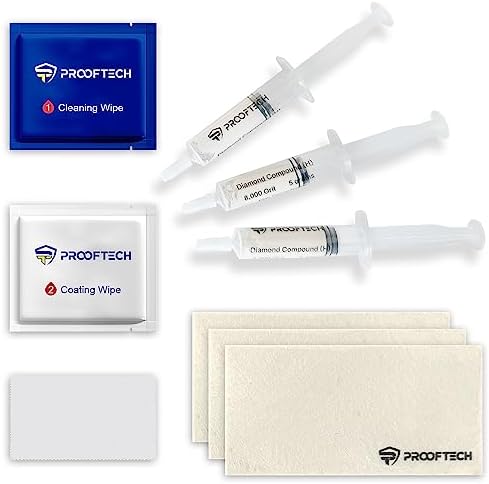
Our phone screen scratch remover kit is designed specifically for addressing light, superficial scratches on screens, ensuring the safety of screen functionality. The kit includes a screen cleaning wet wipe, three diamond polishing pastes, three wool cloths for hand polishing, an oleophobic restoration coating, and a microfiber cloth.
First, determine whether you are dealing with a “right” scratch. This means it is light and, although visible, cannot be easily caught with your fingernail. If the scratch is deep, it is not safe to attempt to remove it as it may affect the screen’s functionality.
Prior to using the kit, clean the screen with the included wet wipe. Use tape to isolate the scratched area. Apply the polishing compound to a woolen cloth, spreading it evenly. Buff the surface in circular or back-and-forth motions until the scratch disappears. Use separate cloths for different grit sizes to prevent contamination.
Begin by using the 4,000 Grit paste to reduce the scratch. Follow up with the 8,000 Grit paste to remove it completely. For the final polish, use the 50,000 Grit paste. Once the scratch is no longer visible, apply the OLEOPEL Oleophobic coating from the package to restore the screen’s coating.
Please note that phone screens may have coatings such as oil-phobic and anti-reflection coating. When applying the diamond paste, not only will the scratch be removed, but the coating may also be polished off. This can result in a glossy spot where the scratch was. If you prefer the spot to be less noticeable, you may need to polish the entire screen with the same pastes and remove the coating from the rest of the screen. It’s important to make an informed decision based on your preferences.
![SunStory for Samsung Galaxy S21 Ultra 5G Case with HD Screen Protector & Slide Camera Cover & Rotated Ring Kickstand, [Military-Grade] [2 in 1] Phone Case for (Galaxy S21 Ultra 6.8”, Red)](https://edorshop.com/wp-content/uploads/2024/08/51FMvoGmQxL._AC_.jpg)


Comments